Instead of my standard posts for blogging, I've tried to make a sort of video lecture or tutorial where I'm talking while drawing over example images. It is harder than most people would believe to consistently say interesting things while doing something.
The film itself is embedded below, any and all feedback is great. In case you want a regular post as well I think I'll put it up tomorrow or something, I've got all the images and most of the text already.
Click for full post
Showing posts with label theory. Show all posts
Showing posts with label theory. Show all posts
Saturday, December 11, 2010

Sunday, November 21, 2010
Advantage analysis: breaking a map down
In this post I will try to explain a method of analysis that can be applied to a map, finished or in development. The different types of advantages in this post were things that I came across as motivations for why an area looked a certain way while trying to analyze one of my own maps but I will try to apply it to another map just to see if it holds water. While I'm sure that much of this will sound obvious to an experienced gamer, this is a more detailed approach. Starting with a more limited FPS with no classes would make the discussion simpler but I will still base my discussion around Team Fortress 2 since it's the game that I'm most familiar with.
Since this discussion will also be very theoretical I feel a bit limited in my vocabulary but in this post I will use "path" as an one-dimensional object between areas, generally not allowing travel between separate paths except in the case of one-way travel. Due to the sticky/rocketjumps available in Team Fortress 2, paths that you can switch between via special jumping are defined as 1½-way.
The basics of the method is to take a certain number of advantages and then rate a path or an area of the map and rate it according to those advantages. You can also start from the other way around and design the purpose of an area first and what type of classes you want to take that path and then design the advantages around it. Either way is fine, as long as you have a thought process for why you're doing one thing or the other and not just building and then seeing what comes out.
Let's get to it.
While this list is not set in stone, there are five general advantages that seem to come up most often in my own work as reasons for one thing or the other. A few of them have subgroups and you may want to add your own. If you do, go ahead and tell me why you want one thing or the other and I'll see if I add it into the list.
Advantages:
#1: Height - high ground is generally important in most tactical games. Not only does it allow you to see further and gather information, it also makes splash damage weapons more powerful when firing them onto low ground.
#2: Proximity - just how close that path is to the action, getting to where the fight is and quick reinforcements is never a bad thing.
#3: Resources - in Team Fortress 2 this mostly consists of health and ammo but if you're analyzing another game that has weapon pickups or other types of rare-spawning power-ups (quad damage etc.), those are even more important to consider.
#4: Cover - this isn't clearly defined as cover from everything, it could be cover against one class while allowing another to fire at you. One example is the upper area on Hoodoo stage 2 where the only class able to fire up on the cap 1 balcony is the Demoman.
Another side of cover is whether it allows vision or not. Having a covered route with windows on one side that allows perfect information gathering while being fully protected is a powerful thing in itself.
#5: Objectives - while only applicable in cases where there is a separate objective that's not just "kill everyone". Having a Demoman camp the other team's spawn door in TF2 is powerful to the point of being game breaking but it will not by itself make you win.
#6?: Path layout - I've had a hard time wording this part but I don't want to leave it out. What it means is the angle between separate paths and how they work together. Having to defend a 180 degree arc is harder than just having two entrances side by side and defending several different levels makes a team have to split up even more. It's not something that you can apply to a single path but rather where and how they merge together.
Badwater analysis:
I will do my analysis mostly from the attackers perspective. The defending team generally spreads out a lot more to cover all different angles while the attacking team picks one lane to push with one (or more) übers. The advantages will still be mostly the same for the defending team though the use of 1½-way paths and resource placement will favor one team or the other.
While I don't find the payload mode quite as fun as 5cp, pl_badwater is my favorite among all the other game modes. The second and fourth stage are the difficult ones for the attackers and the other two can generally be captured by most teams that get there. The class that I find has the hardest time on this map is the spy, but since I'm such a bad spy to begin with you'll have to take that with a pinch of salt. Maps that allow the defenders to build up sentries also make it really hard for scouts as well but it's not quite as bad as dustbowl.

Step one general layout: a wide open area making it possible to jump nearly anywhere with a single sticky/rocket. Snipers and wrangled sentries are very powerful while pyros, spies and heavies tend to not be. Since the area is so open the gameplay focuses more on pure pushing and explosive spam, the main source of surprise attacks being the defending team jumping down on the cart near the tunnel exits.
#1: Top left cliff - with a height advantage but very little cover, this side is generally cleared out with an uber or not at all. The big ammo pack allows for fairly quick building of a defensive sentry and since a defensive uber on a pyro can airblast the attackers off the cliff this is fairly risky. Even if you push the top with a heavy and clear the sentry out, once the uber is over you will have perfect information on the other defenders but generally can't kill them due to the damage falloff. The high ground also makes it possible to jump down onto the cart once it's gone through the tunnel and continue taking the first stage.
#2: Tunnel - fairly long, very tight and with no cover. The only resource is the cart for the attacking team that resupplies health and ammo. Fairly easily spammed by explosives because of how tight it is. Focused on the objective and will generally not be used for pushes, due to the risk of having the medic sniped. Viable as a route for spies though they are not able to run the whole length cloaked.
#3: Right side slope - very wide and with only one rock formation as cover. Like the top left, this is fairly hard to push without losing the medic to a sniper and fighting uphill will make attackers take a large amount of damage from defending demomen. Since it is still the closest path it will see a lot of action by players focusing more on preventing reinforcements than capturing the point itself.

Step two general layout: two lower ground flat areas with a high ground between them, making it the primary goal for both teams. The roof is one of the most important non-objective areas to hold across all Team Fortress 2 maps.
#1: Cart lane - like the cart path on the first stage but a bit more open, making it easier to avoid splash damage. Tends to have a high amount of sniper fights and is hard to push through with a medic, even though it has a very high reward if you manage to camp the door around the corner. The roof and a sniper at the end tends to shut down this lane entirely.
#2: The roof - a massive height advantage, fairly high on resources as well as having cover in case you need to heal up. The only bad sides is how hard it is to get to as the attacking team, fighting up narrow stairs, a doorway and then destroying the usual sentry without being airblasted off the roof, sniped or just killed by reinforcements. Also quite far from the objective itself, you need to jump down and run back to push the cart.
#3: Container yard - high on cover and resources while being fairly far away makes this a prime area for fast classes like the scout, spy and pyro. The main purpose is as a flanking opportunity for both teams, making it possible to come in the back of either team going up the stairs to the roof.

Step three general layout: unlike the first two stages, the cart path here is the widest route as well as being below both of the other ones. The house on the left as well as the walkway running across the cart path are two areas that make this stage interesting.
#1: Left stair side - higher ground than the cart path but not higher than the defender house on the left, this is an interesting path. Has a long sight line with fairly low cover as well as being a bit too far away from the cart, making it a hard route to push. The low amount of resources also makes this an area that is suited only for a low number of players at a time, especially ones that spend a high amount of ammo like the demo and soldier.
#2: Cart lane - while the area here is very wide, the attackers are still fighting uphill and will generally receive a fair bit of grenade spam. There are powerful resources to the left but there is no cover and you're likely to get sniped if you go for them. Since the path slopes upward on the attacker side as well, the defenders have an equally hard time of pushing back as well, and there are no real flanking opportunities if the attackers have someone in the window.
#3: Right side - while being the closest route as well as having a big ammo and health pack, the exit from this room is also easily spammed with grenades. Since it is so close, pushing an uber with a heavy is fairly easy though sentries around the corner are still hard to take out since the uber generally has to be popped early.
The window here is also an interesting detail since it gives near-perfect information. If you're not actively trying to push forward there is not much to do for classes up here though and you generally have to run back and get the cart even if you manage to take out a sentry nest.

Step four general layout: the upper part of this area is extremely open for both teams, again making the team with the better sniper(s) have a small advantage. The lower part has much better cover with the two nooks for defending sentries as well as the slope leading to the Red spawn, where it is very hard to even notice players.
#1: Window side - the windows being a fair bit above the cart path offer a good high ground while having decent cover from sniper fire. There is some resources and it's a very short path to take. Before deciding to push here you need some information from the rest of your team on where the sentries are since jumping down commits you and makes it impossible to get away. While an uber through the window will generally clear one or more sentry, you will almost never be able to push the cart and it is very hard to get backup.
The biggest problem is getting there in the first place. The defending team has locations with high ground in the two rooms leading to the windows as well as having narrow, easily defensible doorways. There is even a medium healthkit and some ammo even though the defender has to sacrifice position to get them.
#2: Cart lane - very open and with extremely limited resources, this is the least interesting area until you get to the lower part where the defenders have their cover. Pushing the cart further than the beginning of the slope is generally suicidal unless you have team support.
#3: Top right - much longer than the previous two paths, offering a high amount of cover and a fair bit of resources. The windows offer a great sniping spot or information gathering while being extremely far away from the objective. Pushing this route will allow you to get the balcony high ground or camp one of the three spawn exits while not being able to push the cart.
This lane is very similar to the window path; jumping down commits you and you will usually end up far away from the rest of your team or the cart. There is even the same type of 1½-way where the defenders can get in your back.
All the rest: If you've read through this document, two things should have become apparent: the number of paths to any given location seems to be three and the cart is by itself so powerful that it never runs on the high ground. Three separate paths with different advantages and a dash of 1½-way paths seem to offer enough difference for the nine classes in TF2 without making a map too difficult to learn. Especially in the linear form of payload where the paths themselves generally run along the cart path.
The cart, both being the primary objective as well as resupply health and metal to the attacking team makes the cart path itself not require all that many resources. Those that do exist are primarily for the defenders and should be placed where there is some form of cover.
In general, I'd say doing a deeper analysis of a map is very helpful, no matter if it's a finished map or still in development. You may or may not agree on the different advantages I've tried here but the most important part is to design with a purpose and not just go "this is too tight, it needs another path". Break down and define what is already there and what classes or advantages you want to design for before adding something.
Click for full post
Since this discussion will also be very theoretical I feel a bit limited in my vocabulary but in this post I will use "path" as an one-dimensional object between areas, generally not allowing travel between separate paths except in the case of one-way travel. Due to the sticky/rocketjumps available in Team Fortress 2, paths that you can switch between via special jumping are defined as 1½-way.
The basics of the method is to take a certain number of advantages and then rate a path or an area of the map and rate it according to those advantages. You can also start from the other way around and design the purpose of an area first and what type of classes you want to take that path and then design the advantages around it. Either way is fine, as long as you have a thought process for why you're doing one thing or the other and not just building and then seeing what comes out.
Let's get to it.
While this list is not set in stone, there are five general advantages that seem to come up most often in my own work as reasons for one thing or the other. A few of them have subgroups and you may want to add your own. If you do, go ahead and tell me why you want one thing or the other and I'll see if I add it into the list.
Advantages:
#1: Height - high ground is generally important in most tactical games. Not only does it allow you to see further and gather information, it also makes splash damage weapons more powerful when firing them onto low ground.
#2: Proximity - just how close that path is to the action, getting to where the fight is and quick reinforcements is never a bad thing.
#3: Resources - in Team Fortress 2 this mostly consists of health and ammo but if you're analyzing another game that has weapon pickups or other types of rare-spawning power-ups (quad damage etc.), those are even more important to consider.
#4: Cover - this isn't clearly defined as cover from everything, it could be cover against one class while allowing another to fire at you. One example is the upper area on Hoodoo stage 2 where the only class able to fire up on the cap 1 balcony is the Demoman.
Another side of cover is whether it allows vision or not. Having a covered route with windows on one side that allows perfect information gathering while being fully protected is a powerful thing in itself.
#5: Objectives - while only applicable in cases where there is a separate objective that's not just "kill everyone". Having a Demoman camp the other team's spawn door in TF2 is powerful to the point of being game breaking but it will not by itself make you win.
#6?: Path layout - I've had a hard time wording this part but I don't want to leave it out. What it means is the angle between separate paths and how they work together. Having to defend a 180 degree arc is harder than just having two entrances side by side and defending several different levels makes a team have to split up even more. It's not something that you can apply to a single path but rather where and how they merge together.
Badwater analysis:
I will do my analysis mostly from the attackers perspective. The defending team generally spreads out a lot more to cover all different angles while the attacking team picks one lane to push with one (or more) übers. The advantages will still be mostly the same for the defending team though the use of 1½-way paths and resource placement will favor one team or the other.
While I don't find the payload mode quite as fun as 5cp, pl_badwater is my favorite among all the other game modes. The second and fourth stage are the difficult ones for the attackers and the other two can generally be captured by most teams that get there. The class that I find has the hardest time on this map is the spy, but since I'm such a bad spy to begin with you'll have to take that with a pinch of salt. Maps that allow the defenders to build up sentries also make it really hard for scouts as well but it's not quite as bad as dustbowl.
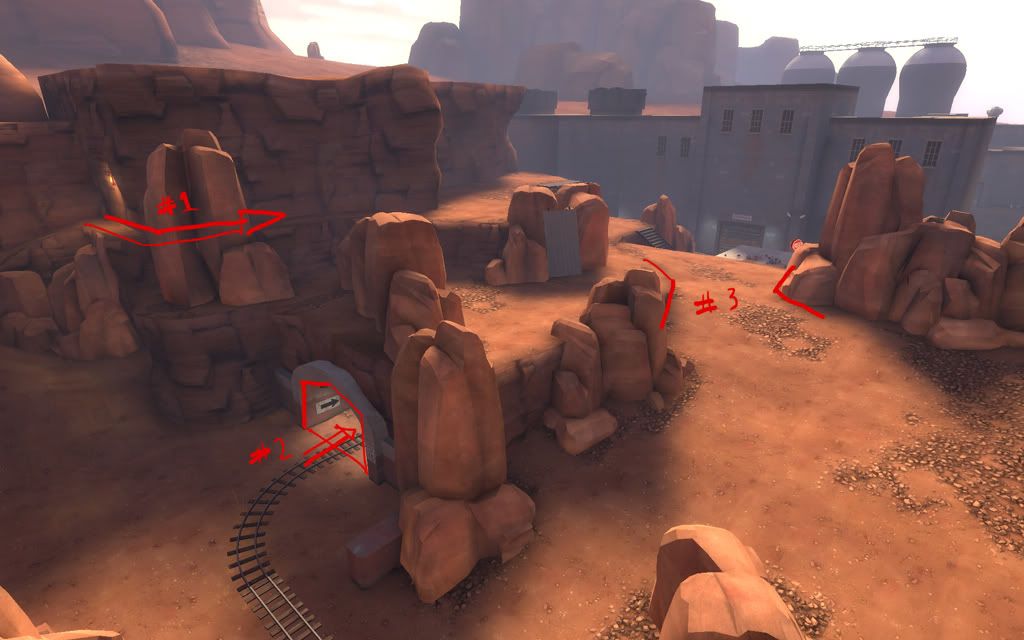
Step one general layout: a wide open area making it possible to jump nearly anywhere with a single sticky/rocket. Snipers and wrangled sentries are very powerful while pyros, spies and heavies tend to not be. Since the area is so open the gameplay focuses more on pure pushing and explosive spam, the main source of surprise attacks being the defending team jumping down on the cart near the tunnel exits.
#1: Top left cliff - with a height advantage but very little cover, this side is generally cleared out with an uber or not at all. The big ammo pack allows for fairly quick building of a defensive sentry and since a defensive uber on a pyro can airblast the attackers off the cliff this is fairly risky. Even if you push the top with a heavy and clear the sentry out, once the uber is over you will have perfect information on the other defenders but generally can't kill them due to the damage falloff. The high ground also makes it possible to jump down onto the cart once it's gone through the tunnel and continue taking the first stage.
#2: Tunnel - fairly long, very tight and with no cover. The only resource is the cart for the attacking team that resupplies health and ammo. Fairly easily spammed by explosives because of how tight it is. Focused on the objective and will generally not be used for pushes, due to the risk of having the medic sniped. Viable as a route for spies though they are not able to run the whole length cloaked.
#3: Right side slope - very wide and with only one rock formation as cover. Like the top left, this is fairly hard to push without losing the medic to a sniper and fighting uphill will make attackers take a large amount of damage from defending demomen. Since it is still the closest path it will see a lot of action by players focusing more on preventing reinforcements than capturing the point itself.
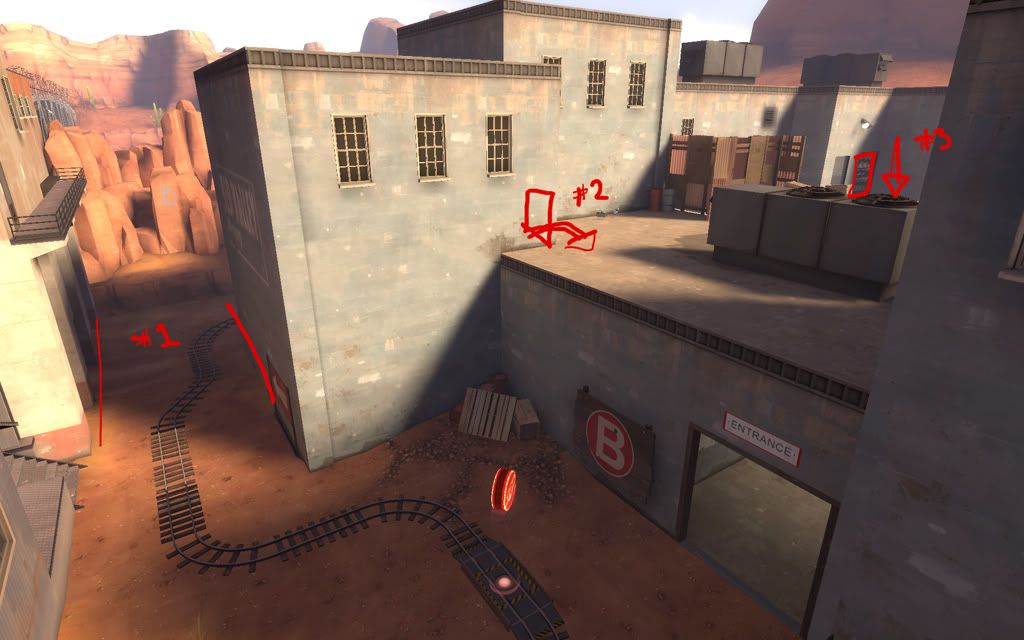
Step two general layout: two lower ground flat areas with a high ground between them, making it the primary goal for both teams. The roof is one of the most important non-objective areas to hold across all Team Fortress 2 maps.
#1: Cart lane - like the cart path on the first stage but a bit more open, making it easier to avoid splash damage. Tends to have a high amount of sniper fights and is hard to push through with a medic, even though it has a very high reward if you manage to camp the door around the corner. The roof and a sniper at the end tends to shut down this lane entirely.
#2: The roof - a massive height advantage, fairly high on resources as well as having cover in case you need to heal up. The only bad sides is how hard it is to get to as the attacking team, fighting up narrow stairs, a doorway and then destroying the usual sentry without being airblasted off the roof, sniped or just killed by reinforcements. Also quite far from the objective itself, you need to jump down and run back to push the cart.
#3: Container yard - high on cover and resources while being fairly far away makes this a prime area for fast classes like the scout, spy and pyro. The main purpose is as a flanking opportunity for both teams, making it possible to come in the back of either team going up the stairs to the roof.
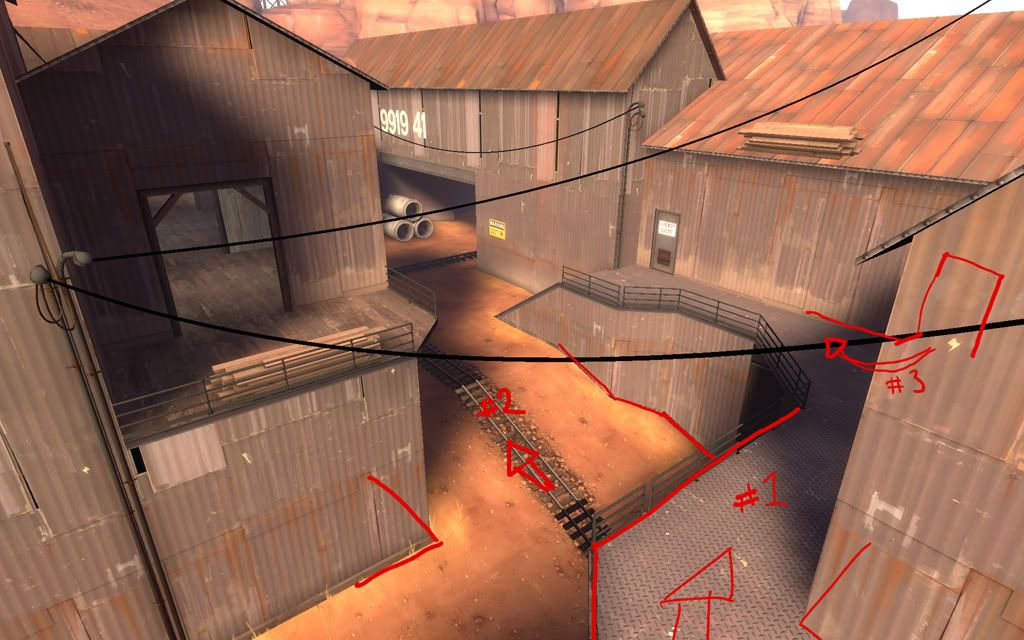
Step three general layout: unlike the first two stages, the cart path here is the widest route as well as being below both of the other ones. The house on the left as well as the walkway running across the cart path are two areas that make this stage interesting.
#1: Left stair side - higher ground than the cart path but not higher than the defender house on the left, this is an interesting path. Has a long sight line with fairly low cover as well as being a bit too far away from the cart, making it a hard route to push. The low amount of resources also makes this an area that is suited only for a low number of players at a time, especially ones that spend a high amount of ammo like the demo and soldier.
#2: Cart lane - while the area here is very wide, the attackers are still fighting uphill and will generally receive a fair bit of grenade spam. There are powerful resources to the left but there is no cover and you're likely to get sniped if you go for them. Since the path slopes upward on the attacker side as well, the defenders have an equally hard time of pushing back as well, and there are no real flanking opportunities if the attackers have someone in the window.
#3: Right side - while being the closest route as well as having a big ammo and health pack, the exit from this room is also easily spammed with grenades. Since it is so close, pushing an uber with a heavy is fairly easy though sentries around the corner are still hard to take out since the uber generally has to be popped early.
The window here is also an interesting detail since it gives near-perfect information. If you're not actively trying to push forward there is not much to do for classes up here though and you generally have to run back and get the cart even if you manage to take out a sentry nest.
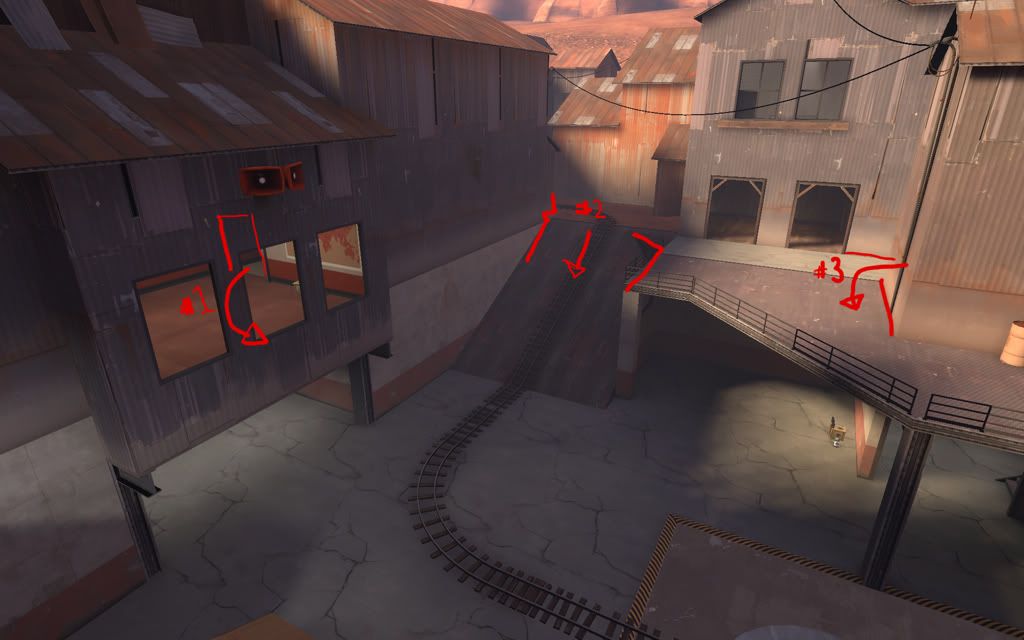
Step four general layout: the upper part of this area is extremely open for both teams, again making the team with the better sniper(s) have a small advantage. The lower part has much better cover with the two nooks for defending sentries as well as the slope leading to the Red spawn, where it is very hard to even notice players.
#1: Window side - the windows being a fair bit above the cart path offer a good high ground while having decent cover from sniper fire. There is some resources and it's a very short path to take. Before deciding to push here you need some information from the rest of your team on where the sentries are since jumping down commits you and makes it impossible to get away. While an uber through the window will generally clear one or more sentry, you will almost never be able to push the cart and it is very hard to get backup.
The biggest problem is getting there in the first place. The defending team has locations with high ground in the two rooms leading to the windows as well as having narrow, easily defensible doorways. There is even a medium healthkit and some ammo even though the defender has to sacrifice position to get them.
#2: Cart lane - very open and with extremely limited resources, this is the least interesting area until you get to the lower part where the defenders have their cover. Pushing the cart further than the beginning of the slope is generally suicidal unless you have team support.
#3: Top right - much longer than the previous two paths, offering a high amount of cover and a fair bit of resources. The windows offer a great sniping spot or information gathering while being extremely far away from the objective. Pushing this route will allow you to get the balcony high ground or camp one of the three spawn exits while not being able to push the cart.
This lane is very similar to the window path; jumping down commits you and you will usually end up far away from the rest of your team or the cart. There is even the same type of 1½-way where the defenders can get in your back.
All the rest: If you've read through this document, two things should have become apparent: the number of paths to any given location seems to be three and the cart is by itself so powerful that it never runs on the high ground. Three separate paths with different advantages and a dash of 1½-way paths seem to offer enough difference for the nine classes in TF2 without making a map too difficult to learn. Especially in the linear form of payload where the paths themselves generally run along the cart path.
The cart, both being the primary objective as well as resupply health and metal to the attacking team makes the cart path itself not require all that many resources. Those that do exist are primarily for the defenders and should be placed where there is some form of cover.
In general, I'd say doing a deeper analysis of a map is very helpful, no matter if it's a finished map or still in development. You may or may not agree on the different advantages I've tried here but the most important part is to design with a purpose and not just go "this is too tight, it needs another path". Break down and define what is already there and what classes or advantages you want to design for before adding something.
Click for full post
Sunday, October 17, 2010
Design layers: from the ground up
The most interesting part of mapmaking has for me always been the early stages of prototyping. It's where you get to start seeing the world that only used to exist inside your head and it's also where you get to make the big rough changes to everything that didn't work, because quite frankly, doing designs only in your head doesn't work for an entire map.
Unfortunately I've yet to find a work flow that I'm quite happy with and I've tried several approaches.
Failiure #1: starting out doing a two-layered design in photoshop did, not unexpectedly result in a map that was extremely flat with only one upper level, much like ctf_2fort but without the underground tunnels.
Failiure #2: making sketches of the art style and theme of the map first and then trying to build good gameplay around it. Starting out with a big valley on one side with a river at the bottom, I managed to make a fairly good first point of a CP map but when I wanted the players to run across bridges to the second point I ran into huge optimization issues. While it's possible to pull off, I would recommend putting the scenic things in the 3D skybox and leave it there.
Failiure #3: jumping straight into Hammer and trying to use big world brushes as a sort of Lego prototype. This seems to be the best of the three, creating a fairly interesting map. Unfortunately it also looked a lot like mix-and-match of selected parts of Dustbowl and Goldrush and was on the whole rather uninspired.
A major benefit of working with large brushes is that you'll virtually never end up with the thin wall problem where you want to make one area bigger or place a big prop where you can't because there is another area on the other side of the wall.
After so many failiures it would be a shame if I didn't learn anything. My latest version of prototyping works is taking a more basic approach, trying to start out with gameplay and the reason of why an area looks in one way instead of another.
Having the motivation for doing an action as the primary concern is a concept I've come across before, mostly while trying to learn poker or Starcraft 2. Doing something bad with a clear and distinct reason for it is often better than doing something good just because you felt like it. A formal and defined thought process is one of the first things you try to get when playing poker and it should hold true in design as well. Instead of "this house is boring, add a door and some windows" it should be "this area should be a low ground area that is the fastest attack route but suffers from weapons with splash damage and has bad sniper cover".
I've mentioned layers before and that is mainly because I think the two-dimensional sketching is still the fastest and easiest way to work on parts of your map, while I wouldn't recommend making the entire layout only in Photoshop.
Layer #1: the gameplay layer.
Having a layer dedicated to taking notes and trying to define your areas is my newest addition to the prototyping phase. Though still mostly untested and unrefined, I think it will be a solid part of my design phase.
What it boils down to is making a lot of notes, trying to define the purpose of an area and then adding on the other layers. Instead of just drawing a doorway on your flat surface, start out with writing a description "choke point with high ground on both sides" and then the reason for it "easy to defend on both sides, fast to push through with ubercharge". Once you've done that, the gameplay of an area has been defined without constricting the brushwork or graphic style.
Since this concept is so abstract it will also help out as an analytical tool, helping you to figure out why some parts of your favourite maps play so well and what sub-parts certain areas break down into.
Layer #2: the brush layer.
After the reasoning for an area is complete (and sometimes before that), it is time to start with the early heavy brushwork (grid size 32/64 Hammer units for "sketching"). If you're making a room, only make the walls that the room itself requires, no roof, windows or other details that make it one single type of structure in your mind, only the actual walls you need for your design.
After your design layer is complete you will also be able to work on several different versions of the same area. As long as it does what is defined in the design, changing a doorway is fine. In early alpha testing you should also try to focus as much as possible on doing changes to the brushwork first and only when and if you notice the design itself being unbalanced should you go back and change it. Since fast iterations rely heavily on fast responses and playtime from your testers, it might be an issue at non-professional levels where custom maps are played rarely if at all. Fortunately, testing small areas one at a time instead of testing the map as a whole should allow for faster iterations.
Making sure to stick within the design while changing architecture also puts more focus on the analytical skills, making sure that you're able to put bad parts into definitions of why it's bad.
Layer #3: the detail layer.
After the brushwork is done, you can put your attention to making the world look good but detailing generally has no place in a prototype thought process. In fact, one of my problems is that I put time into detailing too early, which I will hopefully be able to avoid by focusing more on the design layer. Jumping back between the design and brushwork layers is likely to happen but I think you should stay away from going back to the design layer once you've started on the details and lighting of a map. In essence, the higher layers constrict the lower ones. If you spend hours on detailing, you're less likely to make a needed change on a lower level.
My current five capture point map is my first attempt at using this process with the design layer but I have a good feeling about it, nothing that makes use of a more clearly defined reasoning can be all bad.
Click for full post
Unfortunately I've yet to find a work flow that I'm quite happy with and I've tried several approaches.
Failiure #1: starting out doing a two-layered design in photoshop did, not unexpectedly result in a map that was extremely flat with only one upper level, much like ctf_2fort but without the underground tunnels.
Failiure #2: making sketches of the art style and theme of the map first and then trying to build good gameplay around it. Starting out with a big valley on one side with a river at the bottom, I managed to make a fairly good first point of a CP map but when I wanted the players to run across bridges to the second point I ran into huge optimization issues. While it's possible to pull off, I would recommend putting the scenic things in the 3D skybox and leave it there.
Failiure #3: jumping straight into Hammer and trying to use big world brushes as a sort of Lego prototype. This seems to be the best of the three, creating a fairly interesting map. Unfortunately it also looked a lot like mix-and-match of selected parts of Dustbowl and Goldrush and was on the whole rather uninspired.
A major benefit of working with large brushes is that you'll virtually never end up with the thin wall problem where you want to make one area bigger or place a big prop where you can't because there is another area on the other side of the wall.
After so many failiures it would be a shame if I didn't learn anything. My latest version of prototyping works is taking a more basic approach, trying to start out with gameplay and the reason of why an area looks in one way instead of another.
Having the motivation for doing an action as the primary concern is a concept I've come across before, mostly while trying to learn poker or Starcraft 2. Doing something bad with a clear and distinct reason for it is often better than doing something good just because you felt like it. A formal and defined thought process is one of the first things you try to get when playing poker and it should hold true in design as well. Instead of "this house is boring, add a door and some windows" it should be "this area should be a low ground area that is the fastest attack route but suffers from weapons with splash damage and has bad sniper cover".
I've mentioned layers before and that is mainly because I think the two-dimensional sketching is still the fastest and easiest way to work on parts of your map, while I wouldn't recommend making the entire layout only in Photoshop.
Layer #1: the gameplay layer.
Having a layer dedicated to taking notes and trying to define your areas is my newest addition to the prototyping phase. Though still mostly untested and unrefined, I think it will be a solid part of my design phase.
What it boils down to is making a lot of notes, trying to define the purpose of an area and then adding on the other layers. Instead of just drawing a doorway on your flat surface, start out with writing a description "choke point with high ground on both sides" and then the reason for it "easy to defend on both sides, fast to push through with ubercharge". Once you've done that, the gameplay of an area has been defined without constricting the brushwork or graphic style.
Since this concept is so abstract it will also help out as an analytical tool, helping you to figure out why some parts of your favourite maps play so well and what sub-parts certain areas break down into.
Layer #2: the brush layer.
After the reasoning for an area is complete (and sometimes before that), it is time to start with the early heavy brushwork (grid size 32/64 Hammer units for "sketching"). If you're making a room, only make the walls that the room itself requires, no roof, windows or other details that make it one single type of structure in your mind, only the actual walls you need for your design.
After your design layer is complete you will also be able to work on several different versions of the same area. As long as it does what is defined in the design, changing a doorway is fine. In early alpha testing you should also try to focus as much as possible on doing changes to the brushwork first and only when and if you notice the design itself being unbalanced should you go back and change it. Since fast iterations rely heavily on fast responses and playtime from your testers, it might be an issue at non-professional levels where custom maps are played rarely if at all. Fortunately, testing small areas one at a time instead of testing the map as a whole should allow for faster iterations.
Making sure to stick within the design while changing architecture also puts more focus on the analytical skills, making sure that you're able to put bad parts into definitions of why it's bad.
Layer #3: the detail layer.
After the brushwork is done, you can put your attention to making the world look good but detailing generally has no place in a prototype thought process. In fact, one of my problems is that I put time into detailing too early, which I will hopefully be able to avoid by focusing more on the design layer. Jumping back between the design and brushwork layers is likely to happen but I think you should stay away from going back to the design layer once you've started on the details and lighting of a map. In essence, the higher layers constrict the lower ones. If you spend hours on detailing, you're less likely to make a needed change on a lower level.
My current five capture point map is my first attempt at using this process with the design layer but I have a good feeling about it, nothing that makes use of a more clearly defined reasoning can be all bad.
Click for full post
Subscribe to:
Posts (Atom)


 Posts
Posts

